In this article, I will share with you how to build a secure and production ready authentication system using JWT with Next.js API routes and jose.
Initializing a Next.js application
If you don’t already have a Next.js project, go ahead and create a new Next.js project using the app router.
To create a new Next.js project, navigate to your workspace then run npx create-next-app@latest nextjs_jwt_auth_system_with_api with all default options.
Once the create-next-app command is done, go ahead and open the project in your favourite code editor.
I always like to have a .prettierrc config file to have consistent formatting in all of my projects:
{
  "semi": false,
  "tabWidth": 2,
  "singleQuote": true
}
Installing jose and other dependencies
Now that we created our project, let's install the dependencies we will need for this tutorial.
Core dependencies
jose is a popular npm dependency that we will use to sign and verify our JWT tokens. To install it let’s run npm i jose .
bcrypt is another popular npm dependency that we will use to hash and compare user's password before storing them to our database.
To install it let’s run npm i bcrypt, and because we're using TypeScript we need to also install its types with npm i -D @types/bcrypt.
Good to have dependencies
We will use the date-fns dependency to calculate the expiration date for the remember me feature.
We will use the zod dependency to validate the user input schema in the registration and login forms.
We will use the server-only dependency to protect server-only code on build-time.
To install them let's run the commands: npm i date-fns, npm i server-only, and npm i zod.
Create a Next.js Login page with Tailwind CSS
Under the app directory we will create a new dir (auth) to group all authentication related pages, then create the app/(auth)/login/page.tsx file:
'use client'

import { FormEventHandler, useCallback, useState } from 'react'

export default function Login() {
  const [error, setError] = useState('')

  const onFormSubmit = useCallback<FormEventHandler<HTMLFormElement>>(
    async (e) => {
      e.preventDefault()
      const formData = new FormData(e.currentTarget)
      const res = await fetch('/api/login', {
        method: 'POST',
        body: formData,
      })

      if (!res.ok) {
        setError('Sorry! something went wrong.')
        return
      }

      const json = (await res.json()) as { success: boolean }
      if (!json.success) {
        setError('Invalid credentials.')
        return
      }

      location.href = '/dashboard'
    },
    []
  )

  return (
    <form className="pt-10" onSubmit={onFormSubmit}>
      <div className="w-96 mx-auto border border-gray-300 rounded-md space-y-3 px-6 py-8">
        <div className="space-y-5">
          <div className="pb-3">
            <h2 className="text-xl font-bold text-center">Login</h2>
          </div>
          <div className="space-y-1">
            <label htmlFor="username" className="text-sm font-bold select-none">
              Username
            </label>
            <input
              id="username"
              name="username"
              type="text"
              required
              tabIndex={1}
              placeholder="Username"
              className="block w-full text-sm p-3 bg-white border border-gray-300 placeholder:text-gray-400 focus:outline-none focus:border-gray-400 rounded"
            />
          </div>

          <div className="space-y-1">
            <label htmlFor="password" className="text-sm font-bold select-none">
              Password
            </label>
            <input
              id="password"
              name="password"
              type="password"
              required
              tabIndex={2}
              placeholder="Password"
              className="block w-full text-sm p-3 bg-white border border-gray-300 placeholder:text-gray-400 focus:outline-none focus:border-gray-400 rounded"
            />
          </div>

          <label className="inline-flex items-center space-x-1.5">
            <input type="checkbox" name="remember" tabIndex={3} />
            <span className="text-gray-500 text-xs leading-5 font-bold cursor-pointer select-none">
              Remember me
            </span>
          </label>

          <div className="flex justify-end">
            <button
              type="submit"
              tabIndex={4}
              className="bg-white h-10 border border-gray-400 text-gray-500 hover:border-gray-400 hover:text-black rounded text-sm font-medium px-3"
            >
              Log In
            </button>
          </div>

          {error && (
            <div className="font-medium text-xs text-red-500">{error}</div>
          )}
        </div>
      </div>
    </form>
  )
}
The login page, is straight forward, a simple React JSX with Tailwind CSS for styling and useState for tracking errors state.
We also implemented the onSubmit event to handle to handle the submit of our login form.
First, we create a formData object with the FormData class providing it our form, which automatically maps our form input values to the formData object.
Using the fetch client we make a POST request to the /api/login, which we will create later on in this article.
const formData = new FormData(e.currentTarget)
const res = await fetch('/api/login', {
  method: 'POST',
  body: formData,
})
The fetch API gives us a response, which we use to check if there was any errors, like invalid credentials, or something broke on our server.
In case, there was an error we show it to the user with setError, otherwise if all went well we login the user and redirect him to the dashboard page.
if (!res.ok) {
  setError('Sorry! something went wrong.')
  return
}

const json = (await res.json()) as { success: boolean }
if (!json.success) {
  setError('Invalid credentials.')
  return
}

location.href = '/dashboard'
We use the useCallback hook to avoid redefining the onFormSubmit handler on each render thus improving page performance.
Now, if you go to the login route at localhost:3000/login you should see the login form, but for now we're only focusing on pages design and client-side logic.
Create a Next.js Registration page with Tailwind CSS
Under the same folder (auth), let's create another route for our registration page, by creating a new file at app/(auth)/register/page.tsx:
'use client'

import { FormEventHandler, useCallback, useState } from 'react'

export default function Register() {
  const [error, setError] = useState('')

  const onFormSubmit = useCallback<FormEventHandler<HTMLFormElement>>(
    async (e) => {
      e.preventDefault()
      const formData = new FormData(e.currentTarget)
      const res = await fetch('/api/register', {
        method: 'POST',
        body: formData,
      })

      if (!res.ok) {
        setError('Sorry! something went wrong.')
        return
      }

      const json = (await res.json()) as { success: boolean }
      if (!json.success) {
        setError('Invalid credentials.')
        return
      }

      location.href = '/login'
    },
    []
  )

  return (
    <form className="pt-10" onSubmit={onFormSubmit}>
      <div className="w-96 mx-auto border border-gray-300 rounded-md space-y-3 px-6 py-8">
        <div className="space-y-5">
          <div className="pb-3">
            <h2 className="text-xl font-bold text-center">Registration</h2>
          </div>
          <div className="space-y-1">
            <label htmlFor="username" className="text-sm font-bold select-none">
              Username
            </label>
            <input
              id="username"
              name="username"
              type="text"
              required
              tabIndex={1}
              placeholder="Username"
              className="block w-full text-sm p-3 bg-white border border-gray-300 placeholder:text-gray-400 focus:outline-none focus:border-gray-400 rounded"
            />
          </div>

          <div className="space-y-1">
            <label htmlFor="password" className="text-sm font-bold select-none">
              Password
            </label>
            <input
              id="password"
              name="password"
              type="password"
              required
              tabIndex={2}
              placeholder="Password"
              className="block w-full text-sm p-3 bg-white border border-gray-300 placeholder:text-gray-400 focus:outline-none focus:border-gray-400 rounded"
            />
          </div>

          <div className="flex justify-end">
            <button
              type="submit"
              tabIndex={3}
              className="bg-white h-10 border border-gray-400 text-gray-500 hover:border-gray-400 hover:text-black focus:outline-none focus:border-gray-400 rounded text-sm font-medium px-3"
            >
              Register
            </button>
          </div>
          {error && (
            <div className="font-medium text-xs text-red-500">{error}</div>
          )}
        </div>
      </div>
    </form>
  )
}
To make it simple, I kept the registration form similar to the login form, normally the registration will include more user information like Email, Name, etc..
You can use your own login/registration forms, the only important point is for you to understand how to use the login, and register API endpoints.
So, if you understand the onFormSubmit function that we use to handle our form submit, you can adapt both input fields, and error handling for your use-cases.
Similar to the login request, if the response was not ok, we show an error to the user, otherwise we do a redirect to the login page.
Later, we will see how we can use httpOnly cookie to login the user, so you can decide if you want to authenticate the user after registration or redirect him to the login page like we're doing here.
Now, if you go to the register route at localhost:3000/register you should see the registration form, but same as for login for now we only have the design and client-side logic.
Setup a dummy JSON based database
In case, you already have a real database ORM setup like prisma, drizzle ORM, or any other ORM of your choice, please:
- Ignore this section as it's only for this article purpose.
- Adapt the necessary part in the upcoming sections to your ORM.
To make it simpler, I decided to go with a simple JSON based database, so let's create our ORM to read/write our json file.
Let's start by creating a new file at lib/server/database.ts
import 'server-only'
import { join } from 'node:path'
import { readFile, writeFile } from 'node:fs/promises'

type User = {
  id: number
  username: string
  password: string
}

type Database = { users: User[] }

export type SafeUser = Omit<User, 'password'>

const databasePath = join(process.cwd(), 'lib/server/database.json')

async function readDatabase(): Promise<Database> {
  return JSON.parse(await readFile(databasePath, { encoding: 'utf8' }))
}

async function writeToDatabase(database: Database) {
  await writeFile(databasePath, JSON.stringify(database))
}

export async function getUserById(id: number): Promise<User | null> {
  const database = await readDatabase()
  return database.users.find((user) => user.id === id) || null
}

export async function getUserByUsername(
  username: string
): Promise<User | null> {
  const database = await readDatabase()
  return database.users.find((user) => user.username === username) || null
}

export async function saveNewUser(user: Omit<User, 'id'>) {
  const database = await readDatabase()
  const recentUser = database.users.slice(-1).pop()
  const id = recentUser ? recentUser.id + 1 : 1

  database.users.push({ id, ...user })

  await writeToDatabase(database)
}
We have two mean async functions readDatabase, and writeToDatabase to manage the content inside our database.json file.
Then we have three high-level functions getUserById, getUserByUsername, and saveNewUser to use in place of an ORM.
It's necessary to manually create the lib/server/database.json file with the following structure:
{ "users": [] }You may noticed that we also have a type type Database = { users: User[] } to model our database structure, as well as the type SafeUser to use when sending a user through API.
Create a Next.js Registration API Route
To create the registration route go ahead and create a new file at app/api/(auth)/register/route.ts
import { z } from 'zod'
import bcrypt from 'bcrypt'
import { saveNewUser } from '@/lib/server/database'

const schema = z.object({
  username: z.string(),
  password: z.string().min(3),
})

export async function POST(request: Request) {
  const formData = await request.formData()

  const parsed = schema.safeParse({
    username: formData.get('username'),
    password: formData.get('password'),
  })

  if (!parsed.success) {
    return Response.json({ success: false })
  }

  const { username, password } = parsed.data

  saveNewUser({
    username,
    password: bcrypt.hashSync(password, 10),
  })

  return Response.json({ success: true })
}
We started by defining a schema to validate the request body using the zod library.
Like mentioned previously, we're keeping it simple with only username and password, but you may have some more fields like: phone, email, etc..
After that we used our zod schema to validate the request payload, before saving it to the database like explained below:
Validating registration form request
const formData = await request.formData()

const parsed = schema.safeParse({
  username: formData.get('username'),
  password: formData.get('password'),
})

if (!parsed.success) {
  return Response.json({ success: false })
}
The schema.safeParse doesn’t throw an exception, instead it returns an object with a success property and a data property in case of success.
If the request includes invalid data, like short password or missing username. We return a response with success as false.
You can adapt the response to your project like returning a Bad Request with the 400 status, and maybe some custom error message.
Saving user to database
Once, the provided data is being validated, we use the saveNewUser we created in the previous section to save a new user to our database.
const { username, password } = parsed.data

saveNewUser({
  username,
  password: bcrypt.hashSync(password, 10),
})

return Response.json({ success: true })
For password, we can't store it in plain text, instead we need to hash it, to do that we're using the bcrypt.hashSync hash method.
Once the user is saved, we send back a json response with { success: true } which informs our registration form that the request was a success.
Create a Next.js Login API Route
Now that we can create users, let's create the login api so we will be able to login to our application.
Go ahead and create a new file at: app/api/(auth)/login/route.ts:
import { z } from 'zod'
import bcrypt from 'bcrypt'
import { addDays } from 'date-fns'
import { cookies } from 'next/headers'
import { signJWT } from '@/lib/server/jwt'
import { getUserByUsername } from '@/lib/server/database'

const schema = z.object({
  username: z.string(),
  password: z.string().min(3),
  remember: z
    .string()
    .transform((val) => val === 'on')
    .catch(false),
})

export async function POST(request: Request) {
  const formData = await request.formData()

  const parsed = schema.safeParse({
    username: formData.get('username'),
    password: formData.get('password'),
    remember: formData.get('remember'),
  })

  if (!parsed.success) {
    return Response.json({ success: false })
  }

  const { username, password, remember } = parsed.data

  const user = await getUserByUsername(username)
  if (!user || !bcrypt.compareSync(password, user.password)) {
    return Response.json({ success: false })
  }

  const token = await signJWT(
    { sub: `${user.id}` },
    { exp: remember ? '7d' : '1d' }
  )

  const cookieStore = await cookies()
  cookieStore.set('token', token, {
    path: '/',
    domain: process.env.APP_HOST || '',
    secure: true,
    expires: remember ? addDays(new Date(), 7) : addDays(new Date(), 1),
    httpOnly: true,
    sameSite: 'strict',
  })

  return Response.json({ success: true })
}
Same here, we started first by defining our zod schema to validate our request body, before trying to check if the user exists and check if the provided password is valid.
Let's break it down, so it's easy to understand why we have each part:
Validating login form request
const formData = await request.formData()

const parsed = schema.safeParse({
  username: formData.get('username'),
  password: formData.get('password'),
  remember: formData.get('remember'),
})

if (!parsed.success) {
  return Response.json({ success: false })
}
Here, we used the same method schema.safeParse to validate the request payload.
Similar to the registration route, if the request is invalid we send back a response with the success flag set to false.
Checking if the provided credentials are correct
const { username, password, remember } = parsed.data

const user = await getUserByUsername(username)
if (!user || !bcrypt.compareSync(password, user.password)) {
  return Response.json({ success: false })
}
After making sure the request contains both username, and password, its time that we use them to check if the user exists on our database or not.
If the user was found, we proceed to the next validation which is comparing if the password is the same as the one we have in hour database.
Because we hash the password before storing it in our database, we need to use the bcrypt.compareSync method which will take care of the comparison.
In case the user was not found, or the password doesn't match what we have in database, we send back a response with the success flag set to false.
Sign JWT Token and store it in an HttpOnly Cookie
JWT Token is a token that your application can use to identify the logged in user, this is secure thanks to a JWT Secret that normally is stored on your environment (.env).
const token = await signJWT(
  { sub: `${user.id}` },
  { exp: remember ? '7d' : '1d' }
)

const cookieStore = await cookies()
cookieStore.set('token', token, {
  path: '/',
  domain: process.env.APP_HOST || '',
  secure: true,
  expires: remember ? addDays(new Date(), 7) : addDays(new Date(), 1),
  httpOnly: true,
  sameSite: 'strict',
})

return Response.json({ success: true })
Now that we made sure that the provided credentials are correct, its time to login the user.
To do that, we first generate the token using the signJWT which is our helper around jose SignJWT class.
You may have noticed an error around this import import { signJWT } from '@/lib/server/jwt', this will be solved once we add the lib/server/jwt.ts file next.
Once we have the token, we store it as an HttpOnly cookie, so it's sent on every request, but can’t be accessible by Javascript, which is kind of a protection against cross-site scripting.
Both JWT Tokens and Cookies have an expiration date, and using the Remember Me flag we decide if we want them to expire after 1 day or a 1 week.
And finally, we send a response with success flag set to true.
Creating the JWT and Env helpers
Instead of directly using jose in the authentication flows, we created wrappers around them, this is will help us organize, reuse, and refactor later on.
Go ahead and create a new file at lib/server/jwt.ts, with the following:
import 'server-only'
import { getEnvVariable } from '@/lib/env'
import { jwtVerify, SignJWT, JWTPayload } from 'jose'

export function signJWT(
  payload: { sub: string },
  options: { exp: string }
): Promise<string> {
  try {
    const alg = 'HS256'
    const secret = new TextEncoder().encode(getEnvVariable('JWT_SECRET'))

    return new SignJWT(payload)
      .setProtectedHeader({ alg })
      .setExpirationTime(options.exp)
      .setIssuedAt()
      .setSubject(payload.sub)
      .sign(secret)
  } catch (error) {
    console.error("Wasn't able to sign the token.", error)
    throw new Error("Wasn't able to sign the token.")
  }
}

export async function verifyJWT(token: string): Promise<JWTPayload | false> {
  const secret = new TextEncoder().encode(getEnvVariable('JWT_SECRET'))
  if (!token) {
    return false
  }

  try {
    const jwt = await jwtVerify(token, secret)
    return jwt.payload
  } catch (error) {
    if (error instanceof Error) {
      console.log('verifyJWT:', error.message)
    }
    return false
  }
}
It's straight forwards, we use SignJWT to sign our JWT Token, and jwtVerify to verify if it's valid using the same secret JWT_SECRET defined in .env file.
If something is not clear please consider checking jose documentation for SignJWT and jwtVerify.
We also made use of the getEnvVariable function which is defined inside lib/env.ts, which is just another helper to read our .env environment variables.
Let's create it by creating a new file at lib/env.ts, then explain how it works:
type EnvVariableKey = 'JWT_SECRET'

export function getEnvVariable(key: EnvVariableKey): string {
  const value = process.env[key]

  if (!value || value.length === 0) {
    console.error(`The environment variable ${key} is not set.`)
    throw new Error(`The environment variable ${key} is not set.`)
  }

  return value
}
First, we define the EnvVariableKey type for variables we have inside our .env file, to help us avoid typos with help of TypeScript.
Create .env file with JWT_SECRET
Now, that we have created the login api, for it to work we need to define the JWT_SECRET inside our .env file.
Lets create a new file .env.local at the root of the project like:
JWT_SECRET="secret_of_32_hexadecimal_and_symbols"We need to keep the JWT_SECRET secure, as well as make it hard to crack, that's why I prefer using a password generator tool to generate it.
Now, you can go ahead, use the /register page to create a new user, then user the /login page to login with newly created user.
You should be able to login and get redirected to the /dashboard page which will be creating and protecting next.
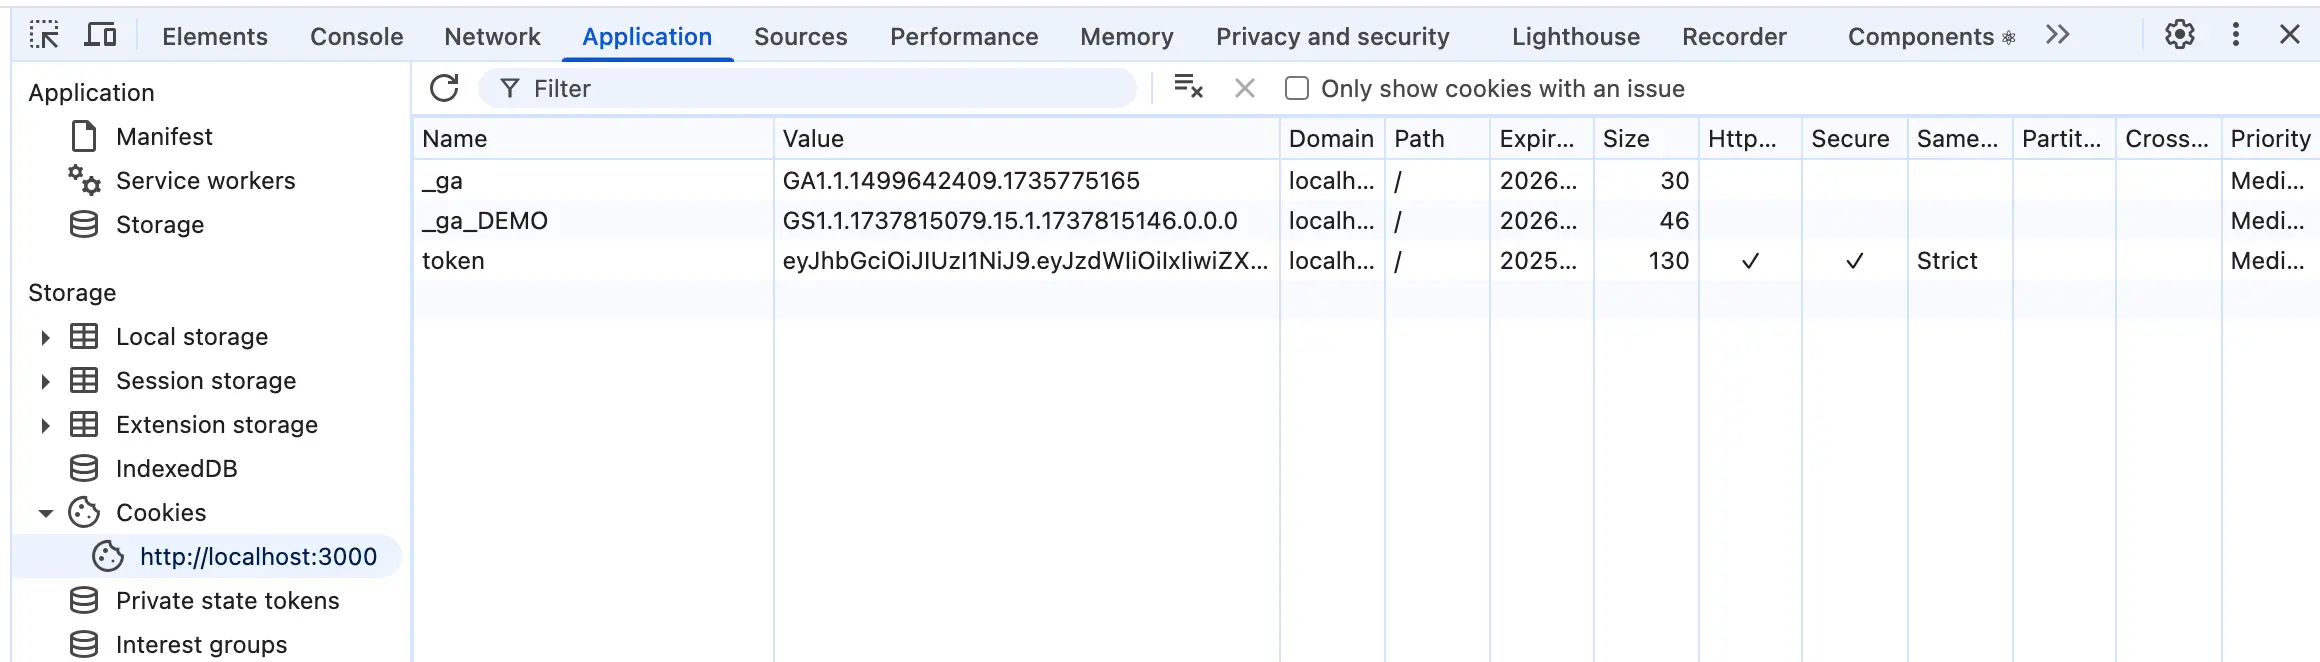
You will also be able to see that we have stored our JWT Token correctly on browser as an HttpOnly cookie:
Share the Authenticated User via React Context
To make the authenticated user available to our application we will create a new API /api/profile, then use it inside a React Context Provider.
Creating the Auth helpers
To make it easy for us to get the auth user, check if the user is authenticated or unauthenticated, we’ll create some helpers at lib/server/auth.ts:
import 'server-only'
import { verifyJWT } from './jwt'
import { cookies } from 'next/headers'
import { redirect } from 'next/navigation'
import { getUserById, SafeUser } from './database'

/**
 * Redirect when a user is unauthenticated
 */
export async function checkUnAuthenticated(url: string = '/') {
  const cookieStore = await cookies()
  const token = cookieStore.get('token')

  if (!token || !token.value) {
    redirect(url)
  }

  const jwtPayload = await verifyJWT(token.value)
  if (jwtPayload === false) {
    redirect(url)
  }
}

/**
 * Redirect when a user is authenticated
 */
export async function checkAuthenticated(url: string = '/login') {
  const cookieStore = await cookies()
  const token = cookieStore.get('token')

  if (token && token.value) {
    const jwtPayload = await verifyJWT(token.value)
    if (jwtPayload !== false) {
      redirect(url)
    }
  }
}

/**
 * Get authenticated user from cookie token
 */
export async function getAuthenticatedUser(): Promise<SafeUser | null> {
  const cookieStore = await cookies()
  const token = cookieStore.get('token')

  if (!token || !token.value) {
    return null
  }

  const jwtPayload = await verifyJWT(token.value)
  if (jwtPayload === false || !jwtPayload.sub) {
    return null
  }

  return getUserById(+jwtPayload.sub) || null
}
The 3 helpers are straight forward, and kind of uses similar principles:
- **checkUnAuthenticated**: if the user is not logged in, redirect the user to the provided page URL.
- User is not authenticated if there's no JWT Token or it's invalid.
- **checkAuthenticated**: if the user is logged in, redirect the user to the provided page URL.
- User is authenticated if there's a valid JWT Token.
- **getAuthenticatedUser**: if the JWT Token is valid, it will the `jwtPayload.sub` to get the user information.
Create a Next.js Profile API Route
After creating the auth helpers, let's use the getAuthenticatedUser function to retrieve the authenticated user and return it as a response for our profile API.
Go ahead and create a new file at app/api/(auth)/profile/route.ts with the following:
import { cookies } from 'next/headers'
import { getAuthenticatedUser } from '@/lib/server/auth'

export async function GET() {
  const user = await getAuthenticatedUser()

  if (!user) {
    /** Remove expired token from the user's browser  */
    const cookieStore = await cookies()
    cookieStore.set('token', '', {
      path: '/',
      domain: process.env.APP_HOST || '',
      secure: true,
      expires: new Date('0000'),
      httpOnly: true,
      sameSite: 'strict',
    })

    return Response.json({
      authUser: null,
    })
  }

  return Response.json({
    authUser: { ...user, password: undefined },
  })
}
Because we’re using this API on every page refresh, we also included logic to remove the expired JWT token in case it was tampered with.
If the user is authenticated, then we respond with the authUser, excluding sensitive information like the password.
Store the Authenticated User in React Context
TODO
Create a Next.js Dashboard Layout to Protect Authenticated Pages
TODO
Create a Next.js Guest Layout to Protect Guest Pages
TODO